Curriculum
Content Posting
Fail to Plan – Plan To Fail
0/3Scheduling Tools
0/4Content Engagement
0/3Insights & Analytics
0/1Using Buffer
The next tool we are covering to help you with your marketing and Social Media marketing is used by David Reid Head Office for their post scheduling. Again the whole purpose of these trainings is to ensure your social media is something that once planned properly fits into your business in the same way as doing your books or managing your stock. You have a system and a process and move on with growing your business and keeping your customers happy.
Buffer has everything you need as a business owner to grow an engaged audience and get results it even has a powerful free plan. Buffer takes care of time-consuming tasks like scheduling and publishing your posts so you can focus on what matters.
It is one of the original Social Media Planners and has four ranges of pricing based on the number of Social media platforms you want to connect to. For the first 3 it is free with each additional channel costing an additional $6 per month along with extra features at each stage.
Let’s take a look at how you can use buffer to plan, draft, schedule, and auto-publish social media content across all major social media channels. One bonus is that Buffer allows you to adjust your post to suit each social media platform.
Getting Started With the Buffer Scheduler
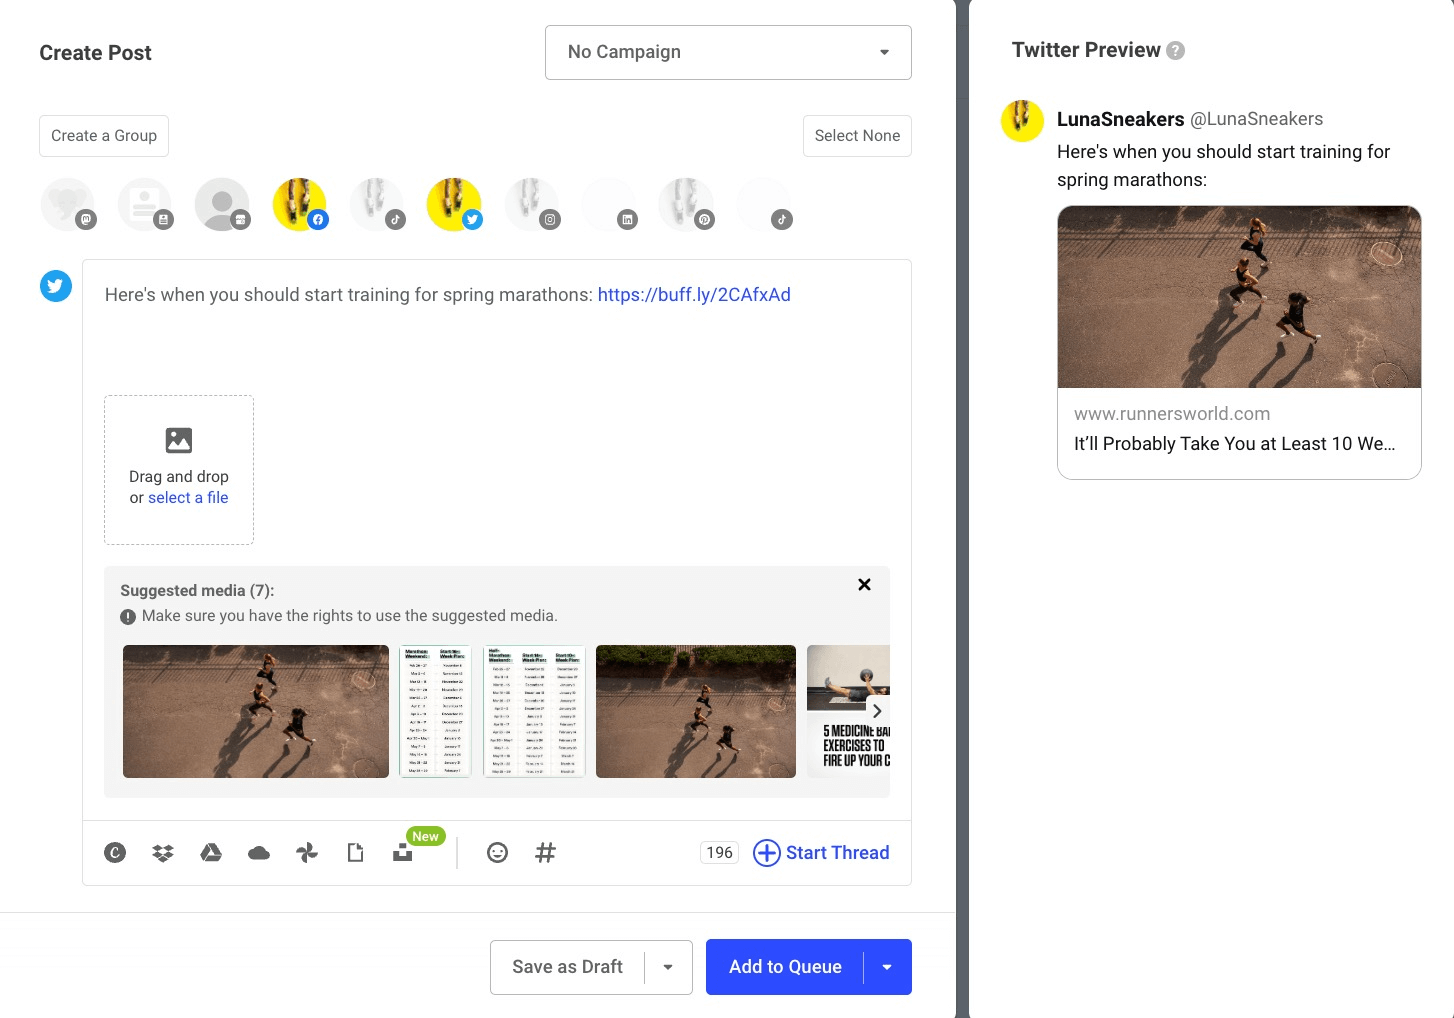
- To get started, click the blue Create Post button, located on the left at the top of your queue. This will open up the composer, which is where you can craft your post.
- From there, select the social channels you’d like to include by clicking on the avatars at the top of the composer.
- If this post is part of a campaign, choose the campaign you’d like to add it to at the top of the composer. If this is the first campaign you’re creating, click the Create a Campaign button in the centre of the page. If you’ve already created one or more campaigns, click Create Campaign in the upper right corner.
- You’re able to customise your post for each social network that you’re sharing to. If the message is going to be similar for each one start with a base for your posts, which you can type in or copy and paste.
- From there, click Customise for each network. A separate box will appear for each type of social network that you’ve selected. For example if you’re sharing to Facebook, Twitter, and LinkedIn, you’ll have three boxes available. If you’re sharing to multiple social channels of the same network, e.g. multiple Facebook accounts, you’d still only have one box per social network.
- You can then modify the text for each one however you’d like. When it comes to adding media to your posts, the options you’ll see will vary depending on the social network you’re sharing to.
- For multi-image posts, images that you attach to your post will appear in the order that you uploaded them. You can rearrange the images by clicking the X on the images. The images will then appear in the “Suggested Media” area below. You can then click on each image in the order you would like them to appear and they will be attached in that order.
Once your posts are ready, you’ll have a few scheduling options:
- Add to Queue (default): Your posts will be added to the next available time slots from your posting schedules (this is usually the bottom of your queue).
- Share Next: Your posts will be saved at the top of your queues and be the next ones to be published. Other posts in your queues will be bumped down one time slot. This option is not available on the Free plan.
- Share Now: Your posts will be published immediately, essentially skipping the queue.
- Schedule Post: You will be able to choose a custom date and time in the future for the posts to be shared.
Free users can have up to 10 scheduled posts queued at a time. Paid users can have up to 2000 scheduled posts queued at a time.
Notes
- Carousel posts for Instagram and Facebook: Please note that you can upload and schedule up to 10 images for Instagram and Facebook. However, if you’d like to schedule a post to multiple social accounts at once and click the Customise for each network button, only the number of images permitted for that social channel will populate. For example, if you’re scheduling both Instagram and LinkedIn posts and upload 10 images when you click Customise for each network, you will see that only nine of your images shows within your LinkedIn composer while all 10 display for your Instagram composer. This is because it is only possible to publish nine images at a time through LinkedIn.
- Carousel posts for LinkedIn: You can publish a post with up to 9 images in a single LinkedIn post, however, due to API limitations, we aren’t able to publish LinkedIn Carousel posts (which are done using PDF).
- Link shortening: On the Free plan, all links will be shortened using the buff.ly link shortener. On the paid plans, you’re able to decide which link shortener to use by heading to Settings. Pinterest does not allow link shortening, so be sure to use a full URL in the destination URL box.
- Facebook page and Twitter mentions: To mention a Facebook page or Twitter profile, simply type the @ symbol and start typing the first few letters of the page or profile you’d like to mention. Matching results will be returned and you can select the one you’d like to include. Learn more here.
- TikTok mentions and hashtags: Any mentions or hashtags in a caption will display as plain-text and not a clickable hyperlink. Mentions of mutual followers is only supported at this time. Additionally, captions have a maximum length of 150 characters.
- Hashtags: You’re able to include hashtags in your posts for any social network (except Pinterest) and they will be hyperlinked once published. It is one of the original Social Media Planners and has four ranges of pricing based on the number of Social media platforms you want to connect to. For the first 3 it is free with each additional channel costing an additional $6 per month along with extra features at each stage.Let’s take a look at how you can use buffer to plan, draft, schedule, and auto-publish social media content across all major social media channels. One bonus is that Buffer allows you to adjust your post to suit each social media platform.
Next Lesson: Using Facebooks Planner